apisix clickhouse log 插件使用

最近在搞kubernetes中的apisix,apisix-ingress 的日志都是标准输出,想着给日志落盘,正好我们公司有clickhouse + grafana,所以想用clickhouse存储日志,然后用grafana展示。在实践中,发现了很多问题,下面我会一步一步来说怎么弄。

本文是结合官方文档来实践的,官方文档地址

创建 clickhouse log 对应的表

文档中并没有说 clickhouse 中的表该如何创建,只给了一个非常简单的表结构:

1
2
3
4
5
6
7
8
CREATE TABLE default.test (
`host` String,
`client_ip` String,
`route_id` String,
`service_id` String,
`@timestamp` String,
PRIMARY KEY(`@timestamp`)
) ENGINE = MergeTree()

毫不客气的说,这个表卵用没有,关键信息什么都没存储。没办法,只好去看源代码:

clickhouse-logger.lua

1
2
3
4
5
6
7
8
9
10
11
12
13
14
15
16
local function send_http_data(conf, log_message)
...
local httpc_res, httpc_err = httpc:request({
method = "POST",
path = url_decoded.path,
query = url_decoded.query,
body = "INSERT INTO " .. conf.logtable .." FORMAT JSONEachRow " .. log_message,
headers = {
["Host"] = url_decoded.host,
["Content-Type"] = "application/json",
["X-ClickHouse-User"] = conf.user,
["X-ClickHouse-Key"] = conf.password,
["X-ClickHouse-Database"] = conf.database
}
})
...

可以看到发送到ck中的是 log_message,然后查看log_message 是哪里来的。

clickhouse-logger.lua

1
2
3
4
5
6
7
8
9
10
11
12
13
14
15
16
17
18
19
20
21
22
23
24
25
26
27
28
29
30
function _M.log(conf, ctx)
local entry = log_util.get_log_entry(plugin_name, conf, ctx)

if batch_processor_manager:add_entry(conf, entry) then
return
end

-- Generate a function to be executed by the batch processor
local func = function(entries, batch_max_size)
local data, err

if batch_max_size == 1 then
data, err = core.json.encode(entries[1]) -- encode as single {}
else
local log_table = {}
for i = 1, #entries do
core.table.insert(log_table, core.json.encode(entries[i]))
end
data = core.table.concat(log_table, " ") -- assemble multi items as string "{} {}"
end

if not data then
return false, 'error occurred while encoding the data: ' .. err
end

return send_http_data(conf, data)
end

batch_processor_manager:add_entry_to_new_processor(conf, entry, ctx, func)
end

这个 log_message 是从 log_util.get_log_entry(plugin_name, conf, ctx) 获取的。去看看 get_log_entry 这个方法:

log-util.lua

1
2
3
4
5
6
7
8
9
10
11
12
13
14
15
16
17
18
19
20
21
22
23
24
function _M.get_log_entry(plugin_name, conf, ctx)
local metadata = plugin.plugin_metadata(plugin_name)
core.log.info("metadata: ", core.json.delay_encode(metadata))

local entry
local customized = false

local has_meta_log_format = metadata and metadata.value.log_format
and core.table.nkeys(metadata.value.log_format) > 0

if conf.log_format or has_meta_log_format then
customized = true
entry = get_custom_format_log(ctx, conf.log_format or metadata.value.log_format)
else
if is_http then
entry = get_full_log(ngx, conf)
else
-- get_full_log doesn't work in stream
core.log.error(plugin_name, "'s log_format is not set")
end
end

return entry, customized
end

这个方法有个逻辑判断,如果在 metadata 中指定了 log_format 而且在 conf 中指定了 log_format,就使用 log_format,否则就使用默认的字段。就是get_full_log这个函数:

get_full_log

1
2
3
4
5
6
7
8
9
10
11
12
13
14
15
16
17
18
19
20
21
22
23
24
25
26
27
28
29
30
31
local function get_full_log(ngx, conf)
...
local log = {
request = {
url = url,
uri = var.request_uri,
method = ngx.req.get_method(),
headers = ngx.req.get_headers(),
querystring = ngx.req.get_uri_args(),
size = var.request_length
},
response = {
status = ngx.status,
headers = ngx.resp.get_headers(),
size = var.bytes_sent
},
server = {
hostname = core.utils.gethostname(),
version = core.version.VERSION
},
upstream = var.upstream_addr,
service_id = service_id,
route_id = route_id,
consumer = consumer,
client_ip = core.request.get_remote_client_ip(ngx.ctx.api_ctx),
start_time = ngx.req.start_time() * 1000,
latency = latency,
upstream_latency = upstream_latency,
apisix_latency = apisix_latency
}
...

可以看到默认的 log 就是上面哪些字段,基本就可以确定了 clickhouse table 的结构了。为了进一步确认,我先开启了file-log,然后查看了一下file-lgo的日志结构,如下:

1
2
3
4
5
6
7
8
9
10
11
12
13
14
15
16
17
18
19
20
21
22
23
24
25
26
27
28
29
30
31
32
33
34
35
36
37
38
39
40
41
42
43
44
45
46
47
48
49
50
51
52
53
54
55
56
57
58
{
"client_ip": "192.168.220.10",
"upstream": "10.9.168.78:9000",
"service_id": "",
"request": {
"url": "http://apisix-dashboard-test.cootekos.com:9080/apisix/admin/global_rules/1",
"querystring": {},
"headers": {
"sec-ch-ua-mobile": "?0",
"sec-ch-ua-platform": "\"macOS\"",
"sec-fetch-site": "same-origin",
"host": "apisix-dashboard-test.cootekos.com",
"sec-fetch-mode": "cors",
"authorization": "eyJhbGciOiJIUzI1NiIsInR5cCI6IkpXVCJ9.eyJleHAiOjE2Nzg5NTk1MjAsImlhdCI6MTY3ODk1NTkyMCwic3ViIjoiYWRtaW4ifQ.7X7Ggmh-qcNt8kvySJ0sDpvfH0QFoxayPNZf_BiDnL0",
"referer": "https://apisix-dashboard-test.cootekos.com/plugin/list",
"connection": "close",
"accept-encoding": "gzip, deflate, br",
"accept-language": "zh-CN,zh;q=0.9,en;q=0.8",
"user-agent": "Mozilla/5.0 (Macintosh; Intel Mac OS X 10_15_7) AppleWebKit/537.36 (KHTML, like Gecko) Chrome/111.0.0.0 Safari/537.36",
"x-request-id": "db0a22e3-d581-4457-8c46-8458b0ee2d77",
"cookie": "_ga=GA1.1.1102582507.1648694885; _ga_YFKNQX5E65=GS1.1.1678955478.71.1.1678956786.0.0.0",
"x-forwarded-for": "117.147.246.23",
"sec-fetch-dest": "empty",
"x-real-ip": "117.147.246.23",
"x-scheme": "https",
"sec-ch-ua": "\"Google Chrome\";v=\"111\", \"Not(A:Brand\";v=\"8\", \"Chromium\";v=\"111\"",
"accept": "*/*"
},
"size": 932,
"method": "GET",
"uri": "/apisix/admin/global_rules/1"
},
"apisix_latency": 0.00016593933105469,
"upstream_latency": 1,
"latency": 1.0001659393311,
"server": {
"hostname": "apisix-77c9c8dfdb-6k42d",
"version": "3.1.0"
},
"start_time": 1678957878768,
"route_id": "721ea032",
"response": {
"headers": {
"content-type": "application/json",
"content-encoding": "gzip",
"x-request-id": "db0a22e3-d581-4457-8c46-8458b0ee2d77",
"server": "APISIX/3.1.0",
"date": "Thu, 16 Mar 2023 09:11:18 GMT",
"content-length": "680",
"content-security-policy": "default-src 'self'; script-src 'self' 'unsafe-eval' 'unsafe-inline'; style-src 'self' 'unsafe-inline'; img-src 'self' data:",
"connection": "close",
"vary": "Accept-Encoding",
"x-frame-options": "deny"
},
"status": 200,
"size": 1102
}
}

于是我们就可以创建对应的 table了:

1
2
3
4
5
6
7
8
9
10
11
12
13
14
15
16
17
18
19
20
21
22
23
24
25
26
27
28
SHOW CREATE TABLE cootek.apisix_log

Query id: 8303aa91-9265-4505-8ba2-8fdc7a3ce154

┌─statement──────────────────────────────────────────────────────────────────────────────────────────────────────────────────────────────────────────────────────────────────────────────────────────────────────────────────────────────────────────────────┐
│ CREATE TABLE cootek.apisix_log
(
`upstream` String,
`start_time` DateTime64(3, 'Asia/Shanghai'),
`client_ip` String,
`service_id` String,
`route_id` String,
`request` Object('json'),
`response` Object('json'),
`server` Object('json'),
`latency` Float64,
`upstream_latency` Float64,
`apisix_latency` Float64
)
ENGINE = MergeTree
PARTITION BY toYYYYMM(start_time)
ORDER BY (start_time, route_id)
TTL toDateTime(start_time) + toIntervalDay(15)
SETTINGS index_granularity = 8192 │
└────────────────────────────────────────────────────────────────────────────────────────────────────────────────────────────────────────────────────────────────────────────────────────────────────────────────────────────────────────────────────────────┘

1 row in set. Elapsed: 0.001 sec.

Tip: 如果自定义了 log_format ,请自己创建对应的表结构。

开启 clickhouse-log 插件

修改配置文件

首先要在apisix配置中开启clickhouse-log插件,因为我使用的是k8s,所以直接修改apisix这个configMap,修改之后重启apisix。

1
2
3
4
5
6
7
8
9
...
plugins: # plugin list
...
- real-ip
- ext-plugin-pre-req
- ext-plugin-post-req
- public-api
- clickhouse-logger # 加上这个插件就行!!
...

然后重启 apisix,我是直接进入 apisxi pod 中直接重启的:

1
$ apisix reload

在 apisix admin 中开启 clickhouse-log

我是搭建了apisix dashboard,所以直接在dashboard中开启的,下面是我的配置:

1
2
3
4
5
6
7
8
9
10
11
12
13
14
15
16
17
{
"_meta": {
"disable": false
},
"batch_max_size": 500,
"buffer_duration": 180,
"database": "xxx",
"disable": false,
"endpoint_addrs": [
"http://xxxx:8123"
],
"logtable": "apisix_log",
"max_retry_count": 5,
"password": "xxx",
"retry_delay": 10,
"user": "xxx"
}

开启之后,就可以去ck中查看数据了。

grafa 支持

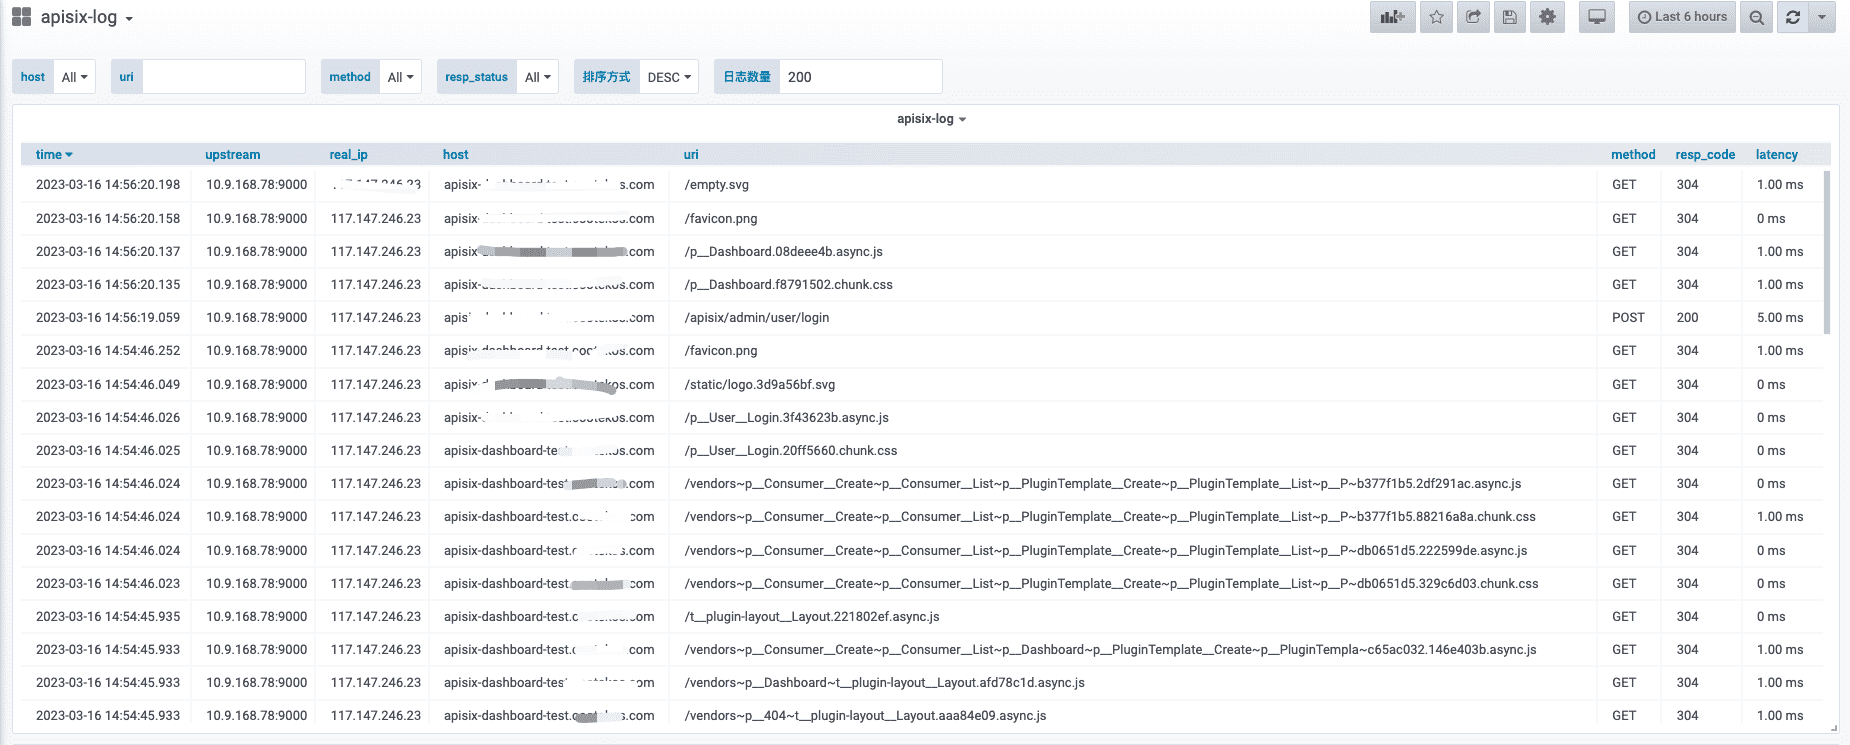
grafana clickhouse

上面就是 clickhouse 在grafana 中的展示,sql 如下:

1
2
3
4
5
6
7
8
9
10
11
12
13
14
15
16
17
18
19
20
21
22
23
24
SELECT
toDateTime64(start_time,3) as time,
upstream,
`request.headers.x-real-ip` as real_ip,
request.headers.host as host,
`request.uri` as uri,
`request.method` as method,
response.status as resp_code,
latency

FROM $table

PREWHERE $timeFilter
$conditionalTest(AND host in ($host), $host)
$conditionalTest(AND method in ($method), $method)
$conditionalTest(AND uri like '%$uri%', $uri)
$conditionalTest(AND resp_code in ($resp_status), $resp_status)

ORDER BY toDateTime64(start_time,3) $sort_way

LIMIT
0,
$log_count

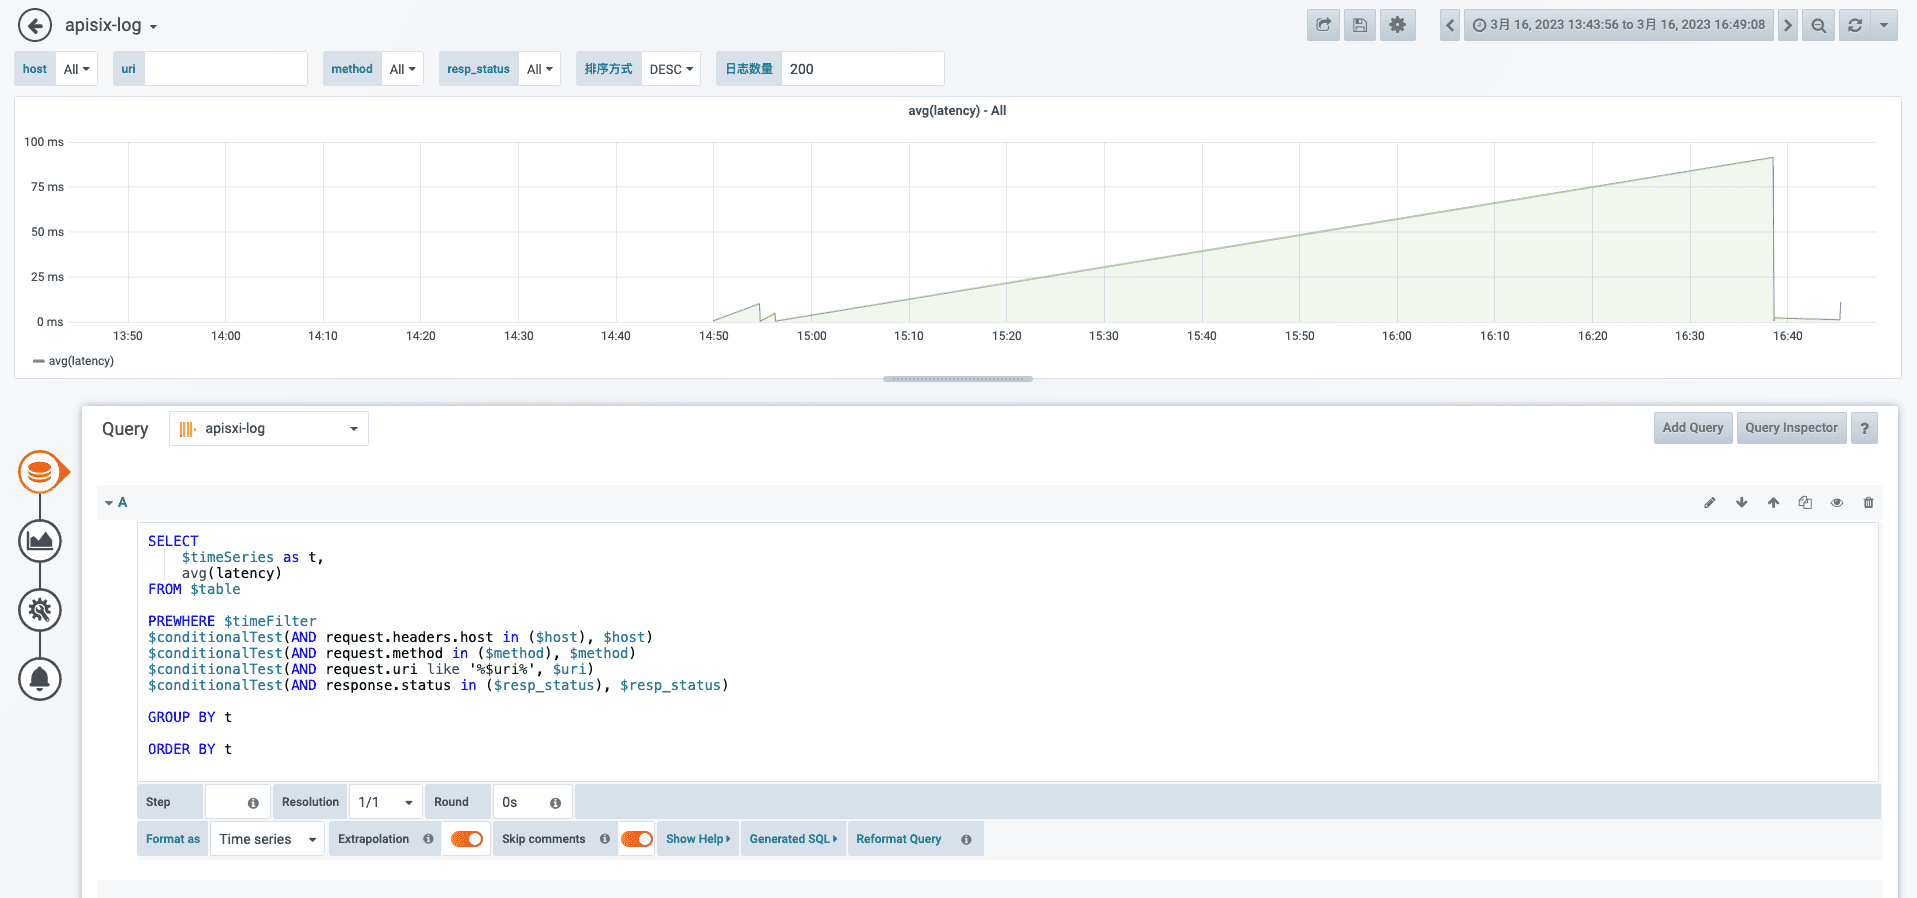
平均延迟

avg latecy

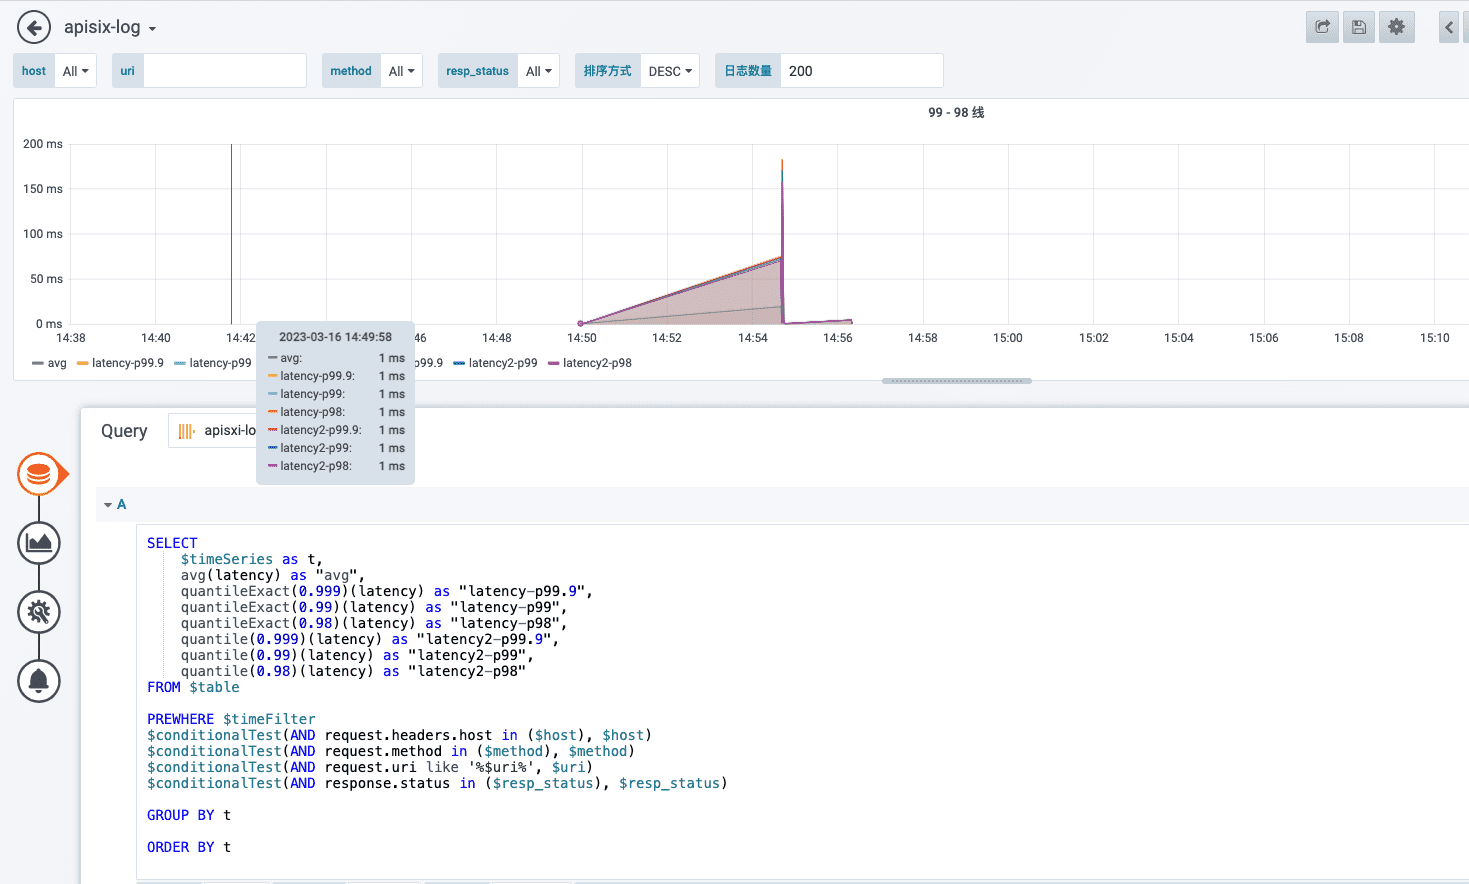
99线和50线

95线

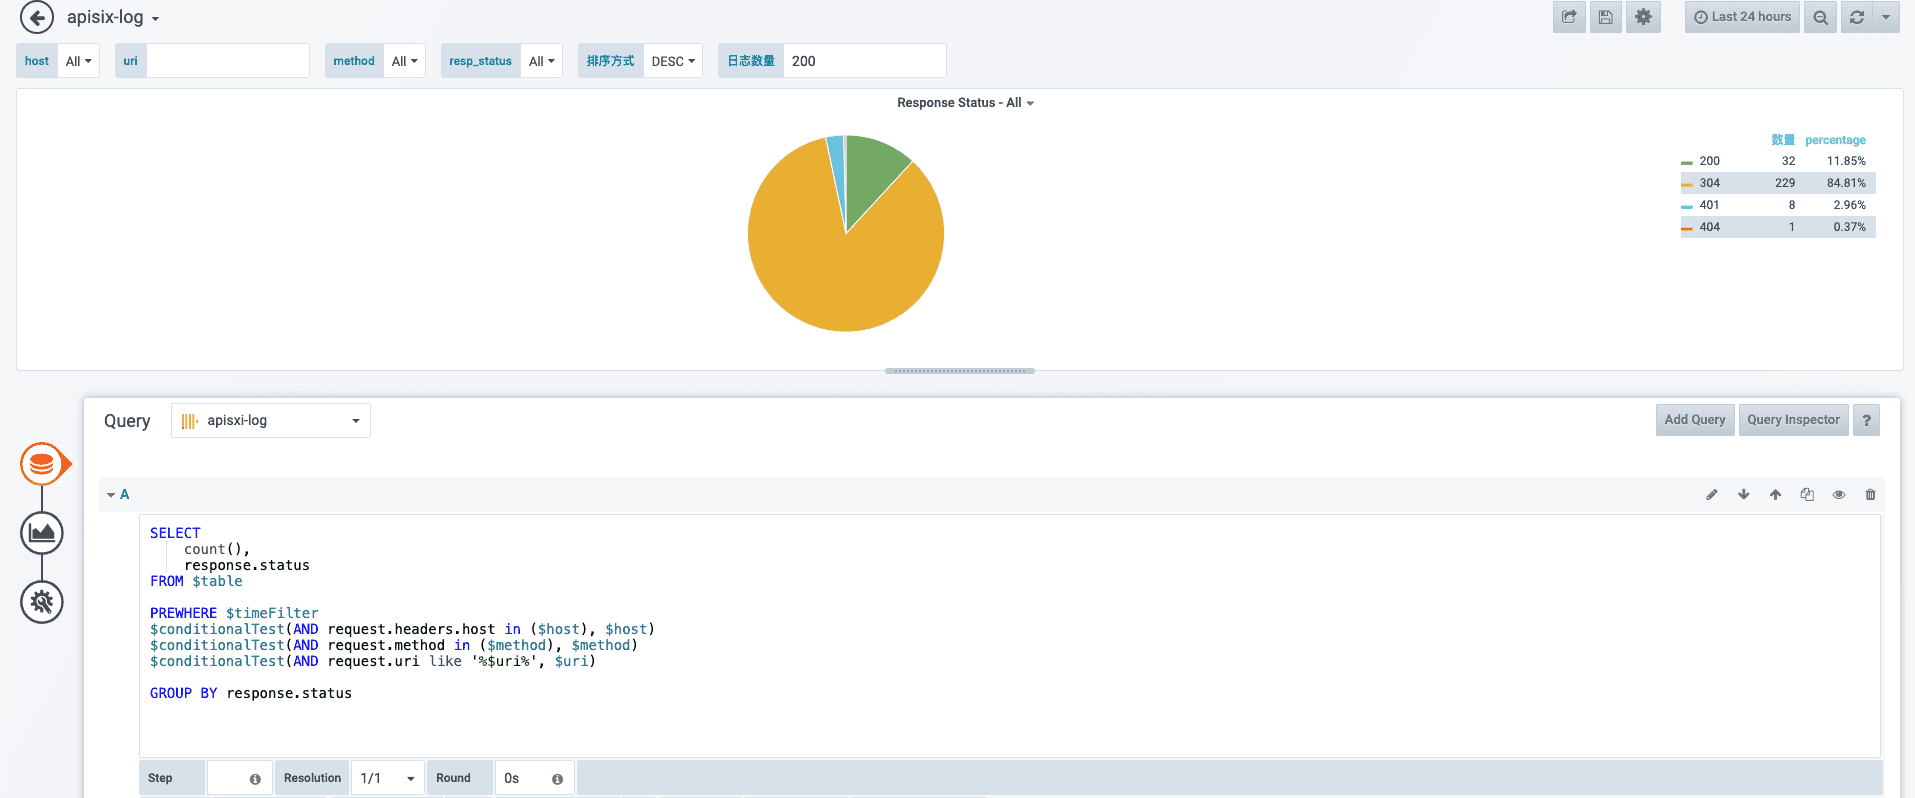
response code 统计

response_code

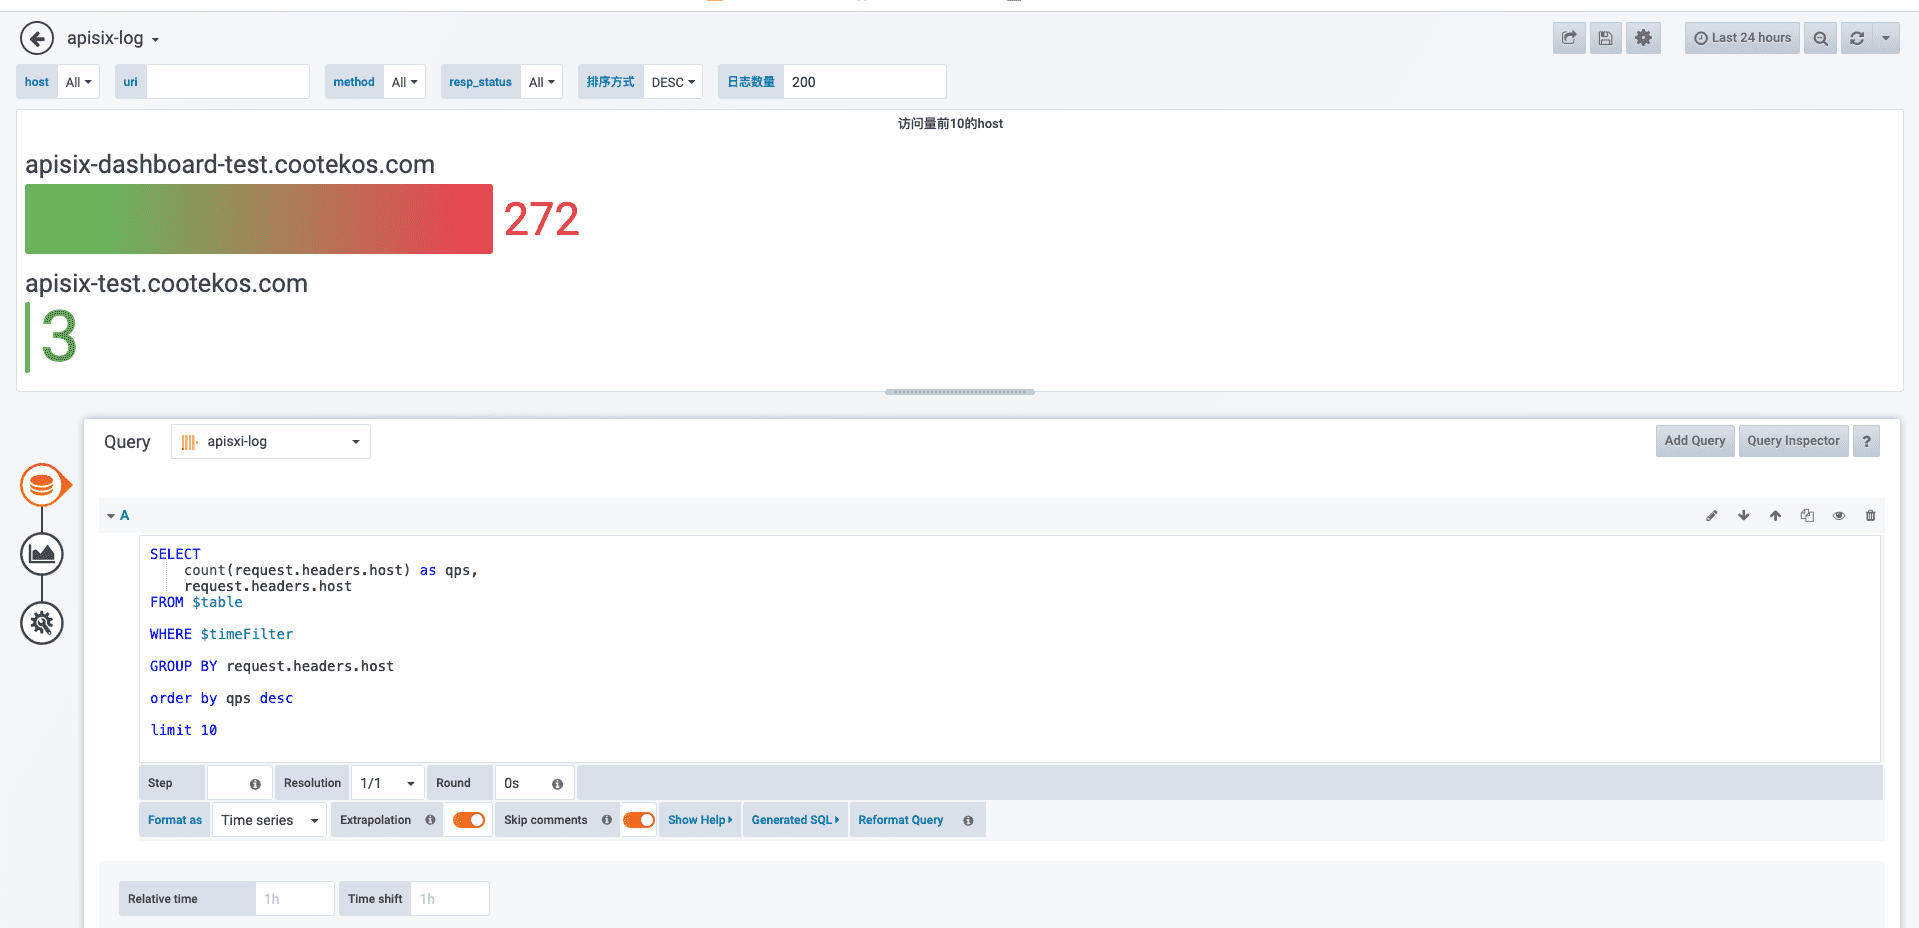
前十 QPS HOST 统计

qps


apisix clickhouse log 插件使用
https://randzz.cn/1a576d262afd/apisix-clickhouse-log-插件使用/
作者
Ezreal Rao
发布于
2023年3月16日
许可协议