什么是shell
解释执行用户输入的命令或程序。
用户输入一条命令,shell就解释一条。
键盘输入命令,Linux给与响应的方式,称之为交互。
Shell是一块包裹着系统核心的壳,处于操作系统的最外层,与用户直接对话,把用户的输入解释给操作系统,然后处理操作系统的输出结果,输出到屏幕给用户。
shebang 计算机程序中,shebang指的是出现在文本第一行前两个字符#!
在Uninx系统中,程序会分析shebang后面的内容,作为解释器的指令,例如:
以#! /bin/sh 开头的文件,程序在执行的时候,会调用/bin/sh,也就是bash去执行。
以#! /usr/bin/python开头的文件,代表指定python解释器去执行。
以#! /usr/bin/env开头的文件,是一种在不同平台都能正确找到解释器的办法。
注意事项:
如果脚本未指定shebang,脚本执行的时候,默认用当前shell去解释脚本,即$SHELL。
如果shebang指定了可执行的解释器,如/bin/bash /usr/bin/python,脚本在执行的时候,文件名会作为参数传递给解释器。
如果#!指定的解释程序没有可执行权限,则会报错bad interpreter; Permission denied
如果#!指定的解释程序不是一个可执行的文件,那么指定的解释程序会被忽略,转而交给当前的$SHELL去执行这个脚本。
如果#!指定的解释程序不存在,那么会报错bad interpreter: No such file or direcrory
#!之后的解释程序,需要写其绝对路径(如 #! /bin/bash),它是不会自动到$PATH中寻找解释器的。
如果你使用bash test.sh 这样的命令来执行脚本,那么#!这一行将会被忽略掉,解释器当然是命令行中显示指定的bash。
脚本案例:
脚本注释,脚本开发规范 在shell脚本中,#后面的内容代表注释掉的内容,提供给开发者或者使用者查看,系统会忽略此行。
注释可以单独写一行,也可以跟在命令后面。
尽量保持爱写注释的习惯,便于以后回顾代码的含义,尽量使用英文,而非中文。
执行shell脚本的方式
Bash scriptse.sh 或 sh scripte.sh,文件本身没有执行权限,没x权限,则使用的方法,或脚本没有指定shebang,重点推荐的方式。使用绝对/相对路径 来执行脚本,需要文件含有x权限。
source script.sh 或者 . script.sh,代表执行的含义,source等于. 。少见的用法, sh < script.sh 。(输入重定向)
shell和运维的关系 shell脚本语言很适合处理纯文本类型数据,且Linux的哲学思想就是一切皆文件,如日志、配置文件、文本、网页文件,大多数都是纯文本类型的,因此shell可以方便的进行文本处理,好比强大的Linux三剑客(grep、sed、awk)。
脚本语言 shell脚本语言属于一种弱类型语言,无需声明变量类型,直接定义使用。
查看系统支持的shell情况:
1 2 3 4 5 6 7 8 9 10 11 12 $ cat /etc/shells# List of acceptable shells for chpass(1). # Ftpd will not allow users to connect who are not using # one of these shells.
查看当前默认使用的shell:
bash
bash 是一个命令处理器,运行在文本窗口中,并能执行用户直接输入的命令
bash 还能从文件中读取linux命令,称之为脚本。
bash 支持通配符、管道、命令替换、条件判断等逻辑控制语句。
bash有诸多方便的功能,有助于运维人员提升工作效率。
命令历史 shell会保留其回话中用户提交执行的命令
1 2 3 4 5 6 $ echo $HISTSIZE $ echo $HISTFILE $ history -c $ history -r filepath $ !historyID $ !!
特性汇总
文件路径tab键补全
命令补全
快捷键crtl + a,e,u,k,l
通配符
历史命令
命令别名
命令行展开
shell变量
1 2 $ name='hello world' $ name = 'hello world'
bash变量默认都是字符串类型的。是一个弱类型语言。
变量引用
1 2 3 name='hello world'
变量名规则
名称定义要做到见名知意,切按照规则来,切不得引用保留关键字
只能包含数字、字母、下划线
不能以数字开头
不能用标点符号
变量名严格区分大小写
变量名的作用域
本地变量,只针对当前的shell进程。
环境变量,也称为全局变量,针对当前shell以及其任意子进程,环境变量也分为自定义、内置两种环境变量。
局部变量,针对在shell函数或是shell脚本中定义。
位置参数变量,用于shell脚本中传递的参数。
特殊变量:shell内置的特殊功效变量。
自定义变量
变量赋值:varname=value
变量引用:${varname}、$varname
单引号不能识别变量,双引号可以识别变量。
1 2 3 4 5 6 7 8 ~ ❯ name='h'$ name2
注意:
每次调用bash都会开启一个子shell,因此不保留当前的shell变量。
调用source是在当前shell环境加载脚本,因此保留变量。
1 2 3 4 5 6 7 8 9 10 11 root@VM-12-2-ubuntu:~# cat t.sh# ! /bin/bash
环境变量设置 环境变量一般指的是用export内置命令导出的变量,用于定义shell的运行环境,保证shell命令的正确执行。
shell通过环境变量确定登陆的用户名、path 路径、文件系统等各种应用。
环境变量可以在命令行中临时创建,但是用户退出shell终端,变量即丢失,如要永久生效,需要修改环境变量配置文件。
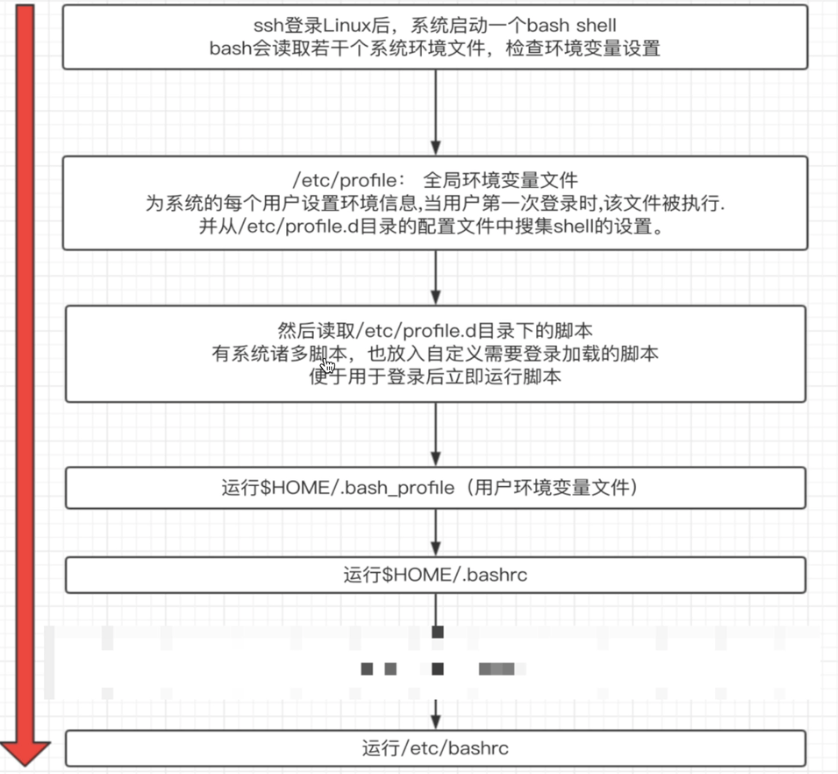
用户个人配置文件 ~/.bash_profile ~/.bashrc 远程登陆用户特有文件。
全局配置文件/etc/profile /etc/bashrc,且系统建议最好创建在/etc/profile.d/,而非直接改主文件,修改全局配置文件,影响所有登陆系统的用户。
检查系统环境变量的命令:
set,输出所有变量,包括全局变量,局部变量。env,只显示全局变量。export,显示和设置环境变量值。
撤销环境变量
设置只读变量
系统保留环境变量关键字
bash内嵌了诸多环境变量,用于定义bash的工作环境。
1 2 3 4 5 6 7 8 9 10 11 12 13 14 15 16 17 18 19 20 21 22 23 24 25 26 27 28 29 30 31 32 33 34 35 36 37 38 39 40 41 42 43 44 45 46 $ ~ ❯ export | awk -F '[ :=]' '{print $1}'
shell加载顺序
shell特殊参数变量 shell的特殊变量,用在如脚本,函数传递参数使用,有如下特殊的,位置参数变量
$0 获取shell脚本文件名,以及脚本路径
$n 获取shell脚本的第n个参数,n在1-9之间,如$1,$2,$9,大于9则需要写,${10},参数空格隔开。
$# 获取执行的shell脚本后面的参数总个数
$* 获取shell脚本所有参数,不加引号等同于$@作用,加上引号”$*”作用是接受所有参数为单个字符串,”$1 $2 $3…”
$@ 不加引号,效果如$*,加引号,是接受所有参数为独立字符串,如”$1” “$2” “$3” … 空格保留。
实战:
1 2 3 4 5 6 7 8 9 10 11 12 13 14 15 16 # ! /bin/bash
$* 和 $@ 在不加引号的区别没有任何区别。$@加引号后,就是单个字符串。
例如:
1 2 3 4 5 6 7 8 9 10 11 12 # ! /bin/bash
运行结果:
1 2 3 4 5 6 7 8 root@VM-12-2-ubuntu:~# bash t.sh a b c d
shell特殊状态变量
$? 获取上一次命令执行状态返回值,0正确,非0失败
$$ 获取当前shell脚本的进程号
$! 获取上一次后台进程的pid
$_ 获取上次执行的命令的最后一个参数
示例:
1 2 3 4 5 6 # ! /bin/bash
内置shell命令
shell子串用法 1 2 3 4 5 6 7 8 9 10 ${变量} 返回变量值length } 提取start之后的length 限制的字符,且包含start
shell 变量截取字符串通常有两种方式:
从指定位置开始截取。
从指定字符(子字符串)开始截取。
1 2 3 4 5 6 7 8 9 10 11 12 13 root@VM-12 -2 -ubuntu:~12 -2 -ubuntu:~12 -2 -ubuntu:~10 12 -2 -ubuntu:~12 -2 -ubuntu:~12 -2 -ubuntu:~1 12 -2 -ubuntu:~10
shell统计字符串的长度 1 2 3 4 1. ${#变量} (速度最快!!)wc -Lexpr length ${变量}
演示:
1 2 3 4 5 6 7 8 9 10 root@VM-12 -2 -ubuntu:~12 -2 -ubuntu:~10 12 -2 -ubuntu:~10 12 -2 -ubuntu:~10 12 -2 -ubuntu:~10
速度比较:
1 2 3 4 5 6 7 8 9 10 11 12 13 14 15 16 17 18 19 20 root@VM-12 -2 -ubuntu:~0 .00 9s0 .010 s0 .000 s12 -2 -ubuntu:~0 .015 s0 .017 s0 .000 s12 -2 -ubuntu:~0 .013 s0 .007 s0 .00 8s12 -2 -ubuntu:~0 .014 s0 .012 s0 .006 s
shell编程,尽量使用内置命令
字符串截取和替换
# 指定字符内容截取
a*c 匹配开头为a,中间任意个字符,结尾为c的字符串
a*C 匹配开头为a,中间任意个字符,结尾为C的字符串
示例:
1 2 3 4 5 root@VM-12 -2 -ubuntu:~12 -2 -ubuntu:~123 abc123abcABC12 -2 -ubuntu:~
批量删除文件名 准备工作
1 2 3 4 5 6 7 8 9 10 11 12 13 14 15 16 root@VM-12 -2 -ubuntu:/var/ opt12 -2 -ubuntu:/var/ opt12 -2 -ubuntu:/var/ opt8 x 2 root root 4096 Apr 30 18 :16 ./x 15 root root 4096 Mar 12 20 :38 ../1 root root 0 Apr 30 18 :16 ezreal_1_hello.jpg1 root root 0 Apr 30 18 :16 ezreal_1_hello.png1 root root 0 Apr 30 18 :16 ezreal_2_hello.jpg1 root root 0 Apr 30 18 :16 ezreal_2_hello.png1 root root 0 Apr 30 18 :16 ezreal_3_hello.jpg1 root root 0 Apr 30 18 :16 ezreal_3_hello.png1 root root 0 Apr 30 18 :16 ezreal_4_hello.jpg1 root root 0 Apr 30 18 :16 ezreal_4_hello.png1 root root 0 Apr 30 18 :16 ezreal_5_hello.jpg1 root root 0 Apr 30 18 :16 ezreal_5_hello.png
执行结果:
1 2 3 4 5 6 7 8 9 10 11 12 13 14 15 16 root@VM-12 -2 -ubuntu:/var/ opt12 -2 -ubuntu:/var/ opt8 x 2 root root 4096 Apr 30 19 :09 ./x 15 root root 4096 Mar 12 20 :38 ../1 root root 0 Apr 30 18 :16 ezreal_1_hello.png1 root root 0 Apr 30 18 :16 ezreal_1.jpg1 root root 0 Apr 30 18 :16 ezreal_2_hello.png1 root root 0 Apr 30 18 :16 ezreal_2.jpg1 root root 0 Apr 30 18 :16 ezreal_3_hello.png1 root root 0 Apr 30 18 :16 ezreal_3.jpg1 root root 0 Apr 30 18 :16 ezreal_4_hello.png1 root root 0 Apr 30 18 :16 ezreal_4.jpg1 root root 0 Apr 30 18 :16 ezreal_5_hello.png1 root root 0 Apr 30 18 :16 ezreal_5.jpg12 -2 -ubuntu:/var/ opt
特殊shell扩展变量 下面四个语法都是对变量的值进行判断、处理。
1 2 3 4 5 6 7 8 9 10 11 $ {parameter :-word }parameter 变量为空,返回word字符串$ {parameter :=word}parameter 变量为空,则word替代变量值,且返回其值$ {parameter :?word}parameter 变量为空,word当做stderr输出,否则输出变量值,用于设置变量为空导致错误时,返回的错误信息。$ {parameter :+word}parameter 为空,什么都不做,否则word返回
示例:
1 2 3 4 5 6 7 8 9 10 11 12 13 14 15 16 17 18 19 root@VM-12 -2 -ubuntu:~12 -2 -ubuntu:~12 -2 -ubuntu:~12 -2 -ubuntu:~12 -2 -ubuntu:~12 -2 -ubuntu:~12 -2 -ubuntu:~12 -2 -ubuntu:~12 -2 -ubuntu:~12 -2 -ubuntu:~
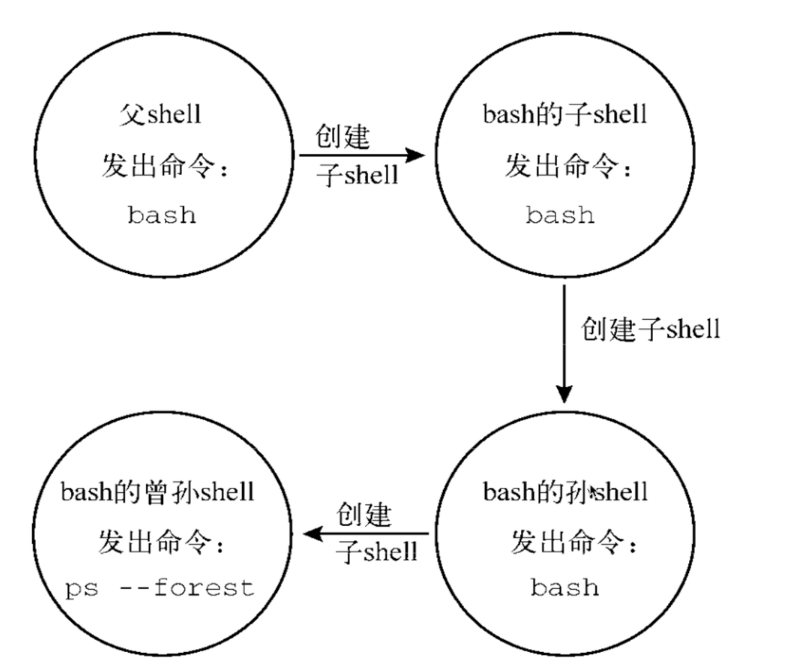
父子shell
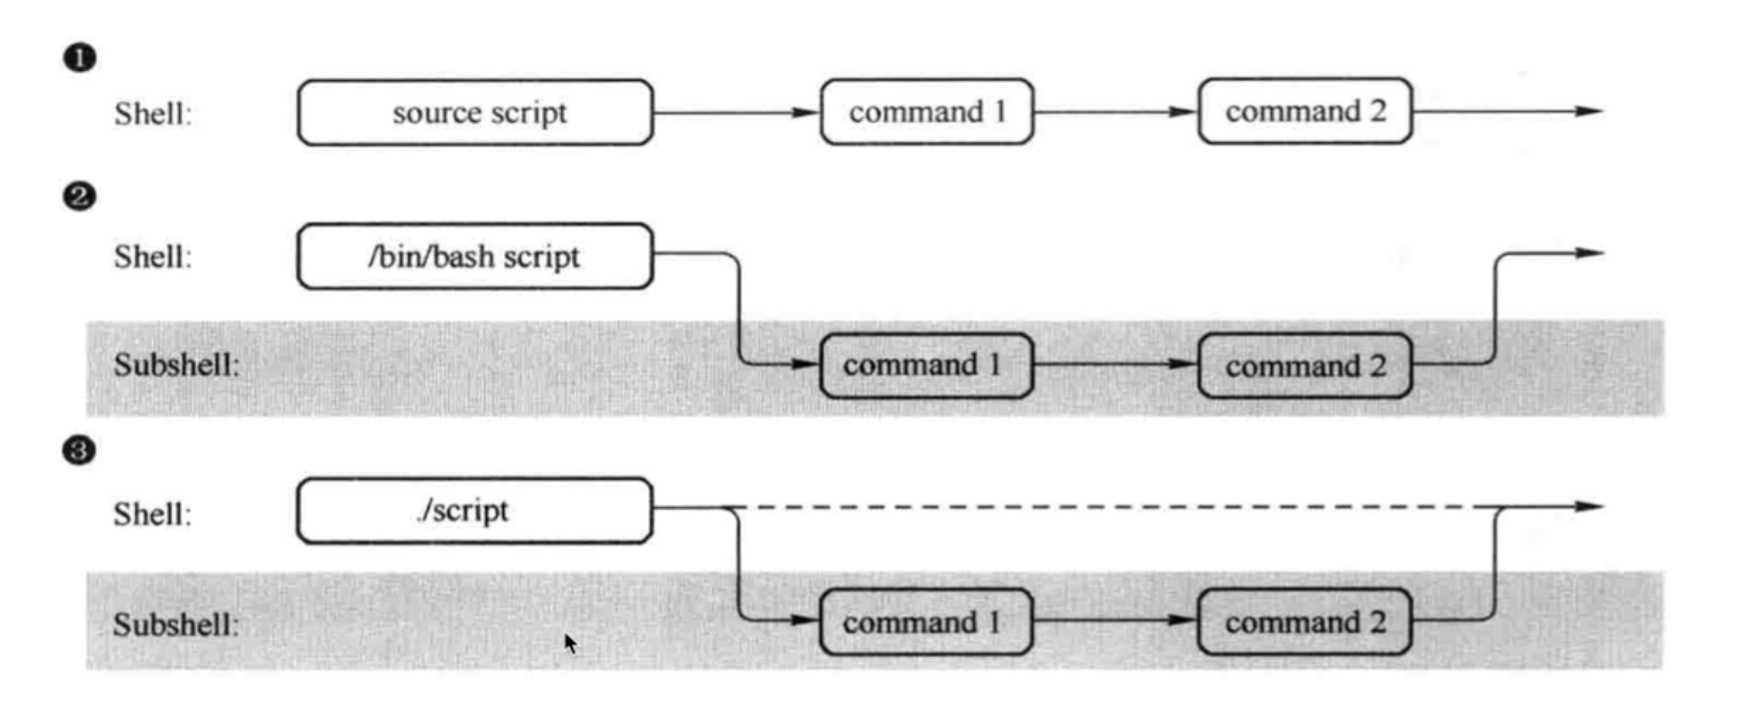
source和.,执行脚本,只在当前的shell环境中执行生效。
指定bash sh 解释运行脚本,是开启subshell,开启子shell运行脚本命令。
./script,都会指定shebang,通过解释器运行,也是开启subshell运行命令。
查看:
1 2 3 4 5 root@VM-12 -2 -ubuntu:~27343 1 0 Mar27 ? 00 :01 :29 php-fpm: master process (/etc/p hp/7.2 /fpm/php-fpm.conf)29232 27343 0 Apr28 ? 00 :00 :24 \_ php-fpm: pool www21658 27343 0 08:32 ? 00 :00 :03 \_ php-fpm: pool www21659 27343 0 08:32 ? 00 :00 :02 \_ php-fpm: pool www
检测是否在shell环境中 linux默认的有关shell的变量
BASH_SUBSHELL
该变量值的特点,如果是0,就是在当前shell环境中执行,否则就是开启了子shell运行的。
如果执行命令用()包裹,就是一个子shell列表。
演示:
1 2 3 4 5 6 7 8 9 10 11 12 13 14 15 16 17 18 19 20 21 22 23 24 25 26 27 28 29 30 31 32 33 34 root@VM-12 -2 -ubuntu:~152 10 root root 4096 Apr 30 14 :53 ./x 24 root root 4096 Apr 30 22 :33 ../1 root root 50730 Apr 30 22 :22 .bash_history1 ubuntu ubuntu 3276 Apr 29 15 :29 .bashrc0 12 -2 -ubuntu:~1 12 -2 -ubuntu:~76 x 18 root root 4096 Apr 24 19 :15 ./x 24 root root 4096 Apr 30 22 :35 ../x --x 4 root root 4096 Mar 8 10 :11 containerd/x 7 root root 4096 Apr 11 22 :06 filebeat-7.5 .2 /x 5 root root 4096 Apr 12 20 :45 go/x 8 root root 4096 Mar 27 19 :31 grafana-8.4 .2 /x 8 root root 4096 Apr 11 20 :41 kafka_2.12 -3.1 .0 /x 3 root root 4096 Jan 11 23 :23 knem-1.1 .4.90 mlnx1/x 7 root root 4096 Jan 11 23 :23 mellanox/x 2 3434 3434 4096 Mar 27 17 :51 mysqld_exporter-0 .14.0 /x 4 root root 4096 Jan 11 23 :23 neohost/x 2 3434 3434 4096 Mar 27 17 :50 node_exporter-1.3 .1 /x 3 root root 4096 Mar 27 20 :53 php-fpm-exporter-0 .6.1 /x 5 3434 3434 4096 Apr 11 18 :05 prometheus-2.33 .4 /x 2 3434 3434 4096 Mar 27 17 :49 pushgateway-1.4 .2 /x 5 root root 4096 Mar 8 10 :16 ql/x 2 3434 3434 4096 Apr 11 18 :20 thanos-0 .25.2 /1 root root 1532 Apr 24 19 :21 wget-log x 4 www www 4096 Apr 30 14 :54 www/3
利用括号,开始子shell的理念,以及检查,在shell脚本开发中,经常会用子shell进行多进程的处理,来提高程序并发执行的效率。
内置命令、外置命令
通过type 可以查看是内置还是外置命令。
内置命令 在系统启动时就加入内存,常驻内存,执行效率更高,但是占用资源。
内置命令不会产生子进程去执行,是和shell为一体的,是shell的一部分,不需要单独去读取某个文件,系统启动后,就常驻在内存中了。
1 2 root@VM-12 -2 -ubuntu:~
查看有哪些内置命令:
1 2 3 4 5 6 7 8 9 10 11 12 13 14 15 16 17 18 19 20 21 22 23 24 25 26 27 28 29 30 31 32 33 34 35 36 37 38 39 40 41 42 43 44 45 46 47 48 49 50 51 52 53 54 55 56 57 58 59 60 61 62 root@VM-12 -2 -ubuntu:~bind break caller continue eval exec exit kill local printf read return shift times umask wait
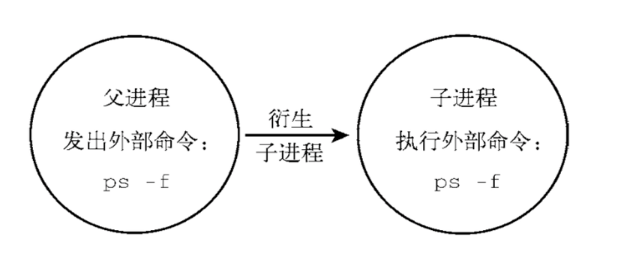
外置命令 用户需要从硬盘中读取程序文件,在读入内存加载。也称之为自己单独下载的文件系统命令,处于bash shell 之外的程序。外置命令的特点是:一定会开启子进程执行。
1 2 3 4 root@VM-12 -2 -ubuntu:~12 -2 -ubuntu:~
其关系如下:


